- Published on
Stop Hand-Crafting Tokens
- Authors

- Name
- Ted
- @supasaf
It’s 2007. I was a young, bright-eyed developer entering the workforce. This was the era of the "Monolith"—giant, heavy software blocks that ruled the earth. We didn’t have fancy "Microservices."
I remember writing C++ code back then. If I needed to call an API from another department, it was like the Wild West. I was manually stitching together HTTP packet headers, byte by byte. Authentication? What authentication? If the network cable was plugged in, we trusted you. "Hey, I’m a packet from the Accounting server!" "Sounds legit, come on in!"
Fast forward to today. In my local market, surprisingly, not much has changed. Many companies still run their internal services like it’s 2007—completely naked, with zero internal authentication.
Recently, I had to provide an API for another team’s system to call. My immediate thought was: "We are doing this right. We are using OAuth 2.0 Client Credentials."
To celebrate this small victory for security (and to make sure I actually understand how it works), I wrote this post to document my journey.
Why We Need to Drop the "Artisanal, Hand-Crafted" Tokens
In many "good enough" architectures, downstream services use a very lazy authentication method: generating a static Token (like a UUID) and hard-coding it into the config file.
I call this the "Hand-Crafted Token." It’s simple, sure. But it’s a security nightmare waiting to happen. Here is why OAuth 2.0 is the adult in the room:
- Lifecycle Management (Rotation & Expiration)
Hand-Crafted: Usually valid forever. If it leaks, you have to change the code, update the config, and restart the servers on both sides. It’s painful.
OAuth 2.0: Access Tokens are short-lived (e.g., 24 hours). If a hacker steals one, they only have a tiny window of time to use it.
- Permissions (Scopes)
Hand-Crafted: Usually represents "God Mode." If you have the token, you can do anything.
OAuth 2.0: Supports Scopes (like
read:datavswrite:order). We can restrict a Python script to only read data, following the Principle of Least Privilege.
- Standardization & Performance
We use JWT (JSON Web Token) based on asymmetric encryption (RS256). The Go service doesn't need to call Auth0 every single time to ask, "Hey, is this token real?" It just downloads a Public Key once and uses math to verify the token locally. This saves network traffic and makes things fast.
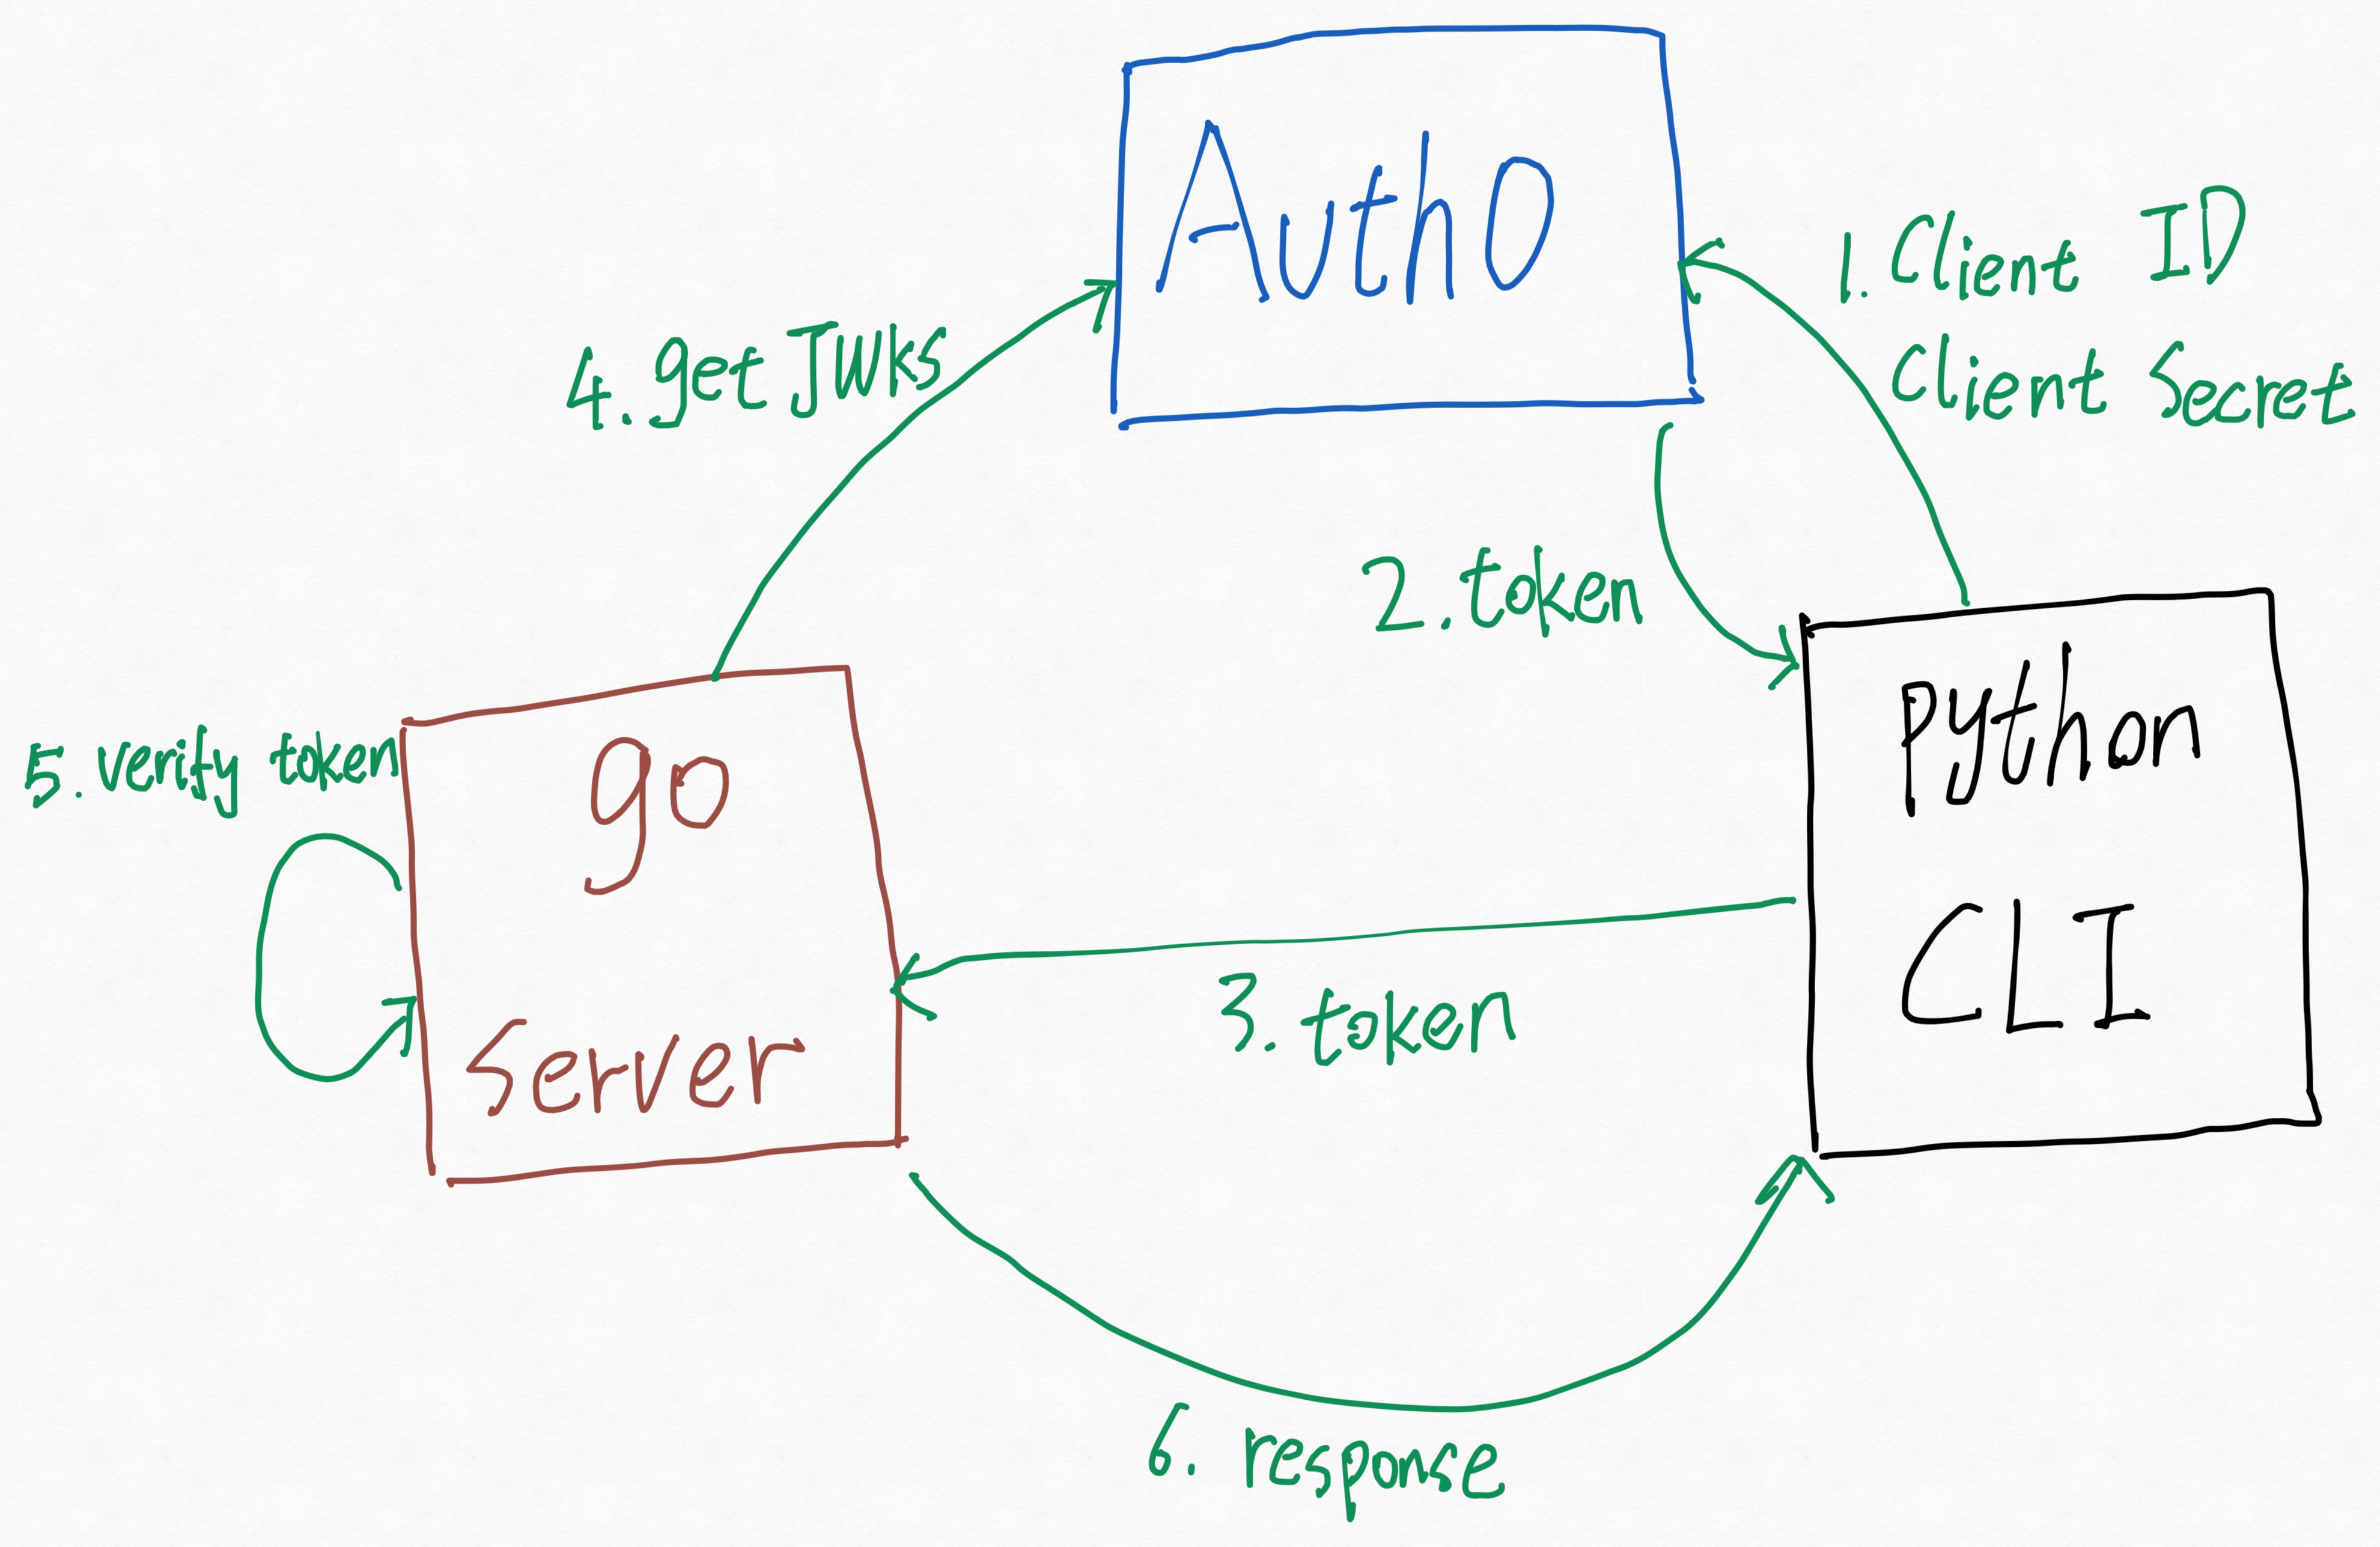
The Flow
- Python CLI (Client) sends
Client IDandClient Secretto Auth0. - Auth0 checks the ID card, and returns a signed JWT Access Token.
- Python CLI puts that token in the Header (
Authorization: Bearer <token>) and calls the Go Server. - Go Server (Resource Server) grabs the Public Key (JWKS) from Auth0, checks the signature, the expiration, and the Scopes.
- Success: Data is returned.
Part 1: Auth0 Configuration (Control Plane)
This is the control center. Log in to your Auth0 Dashboard and follow along.
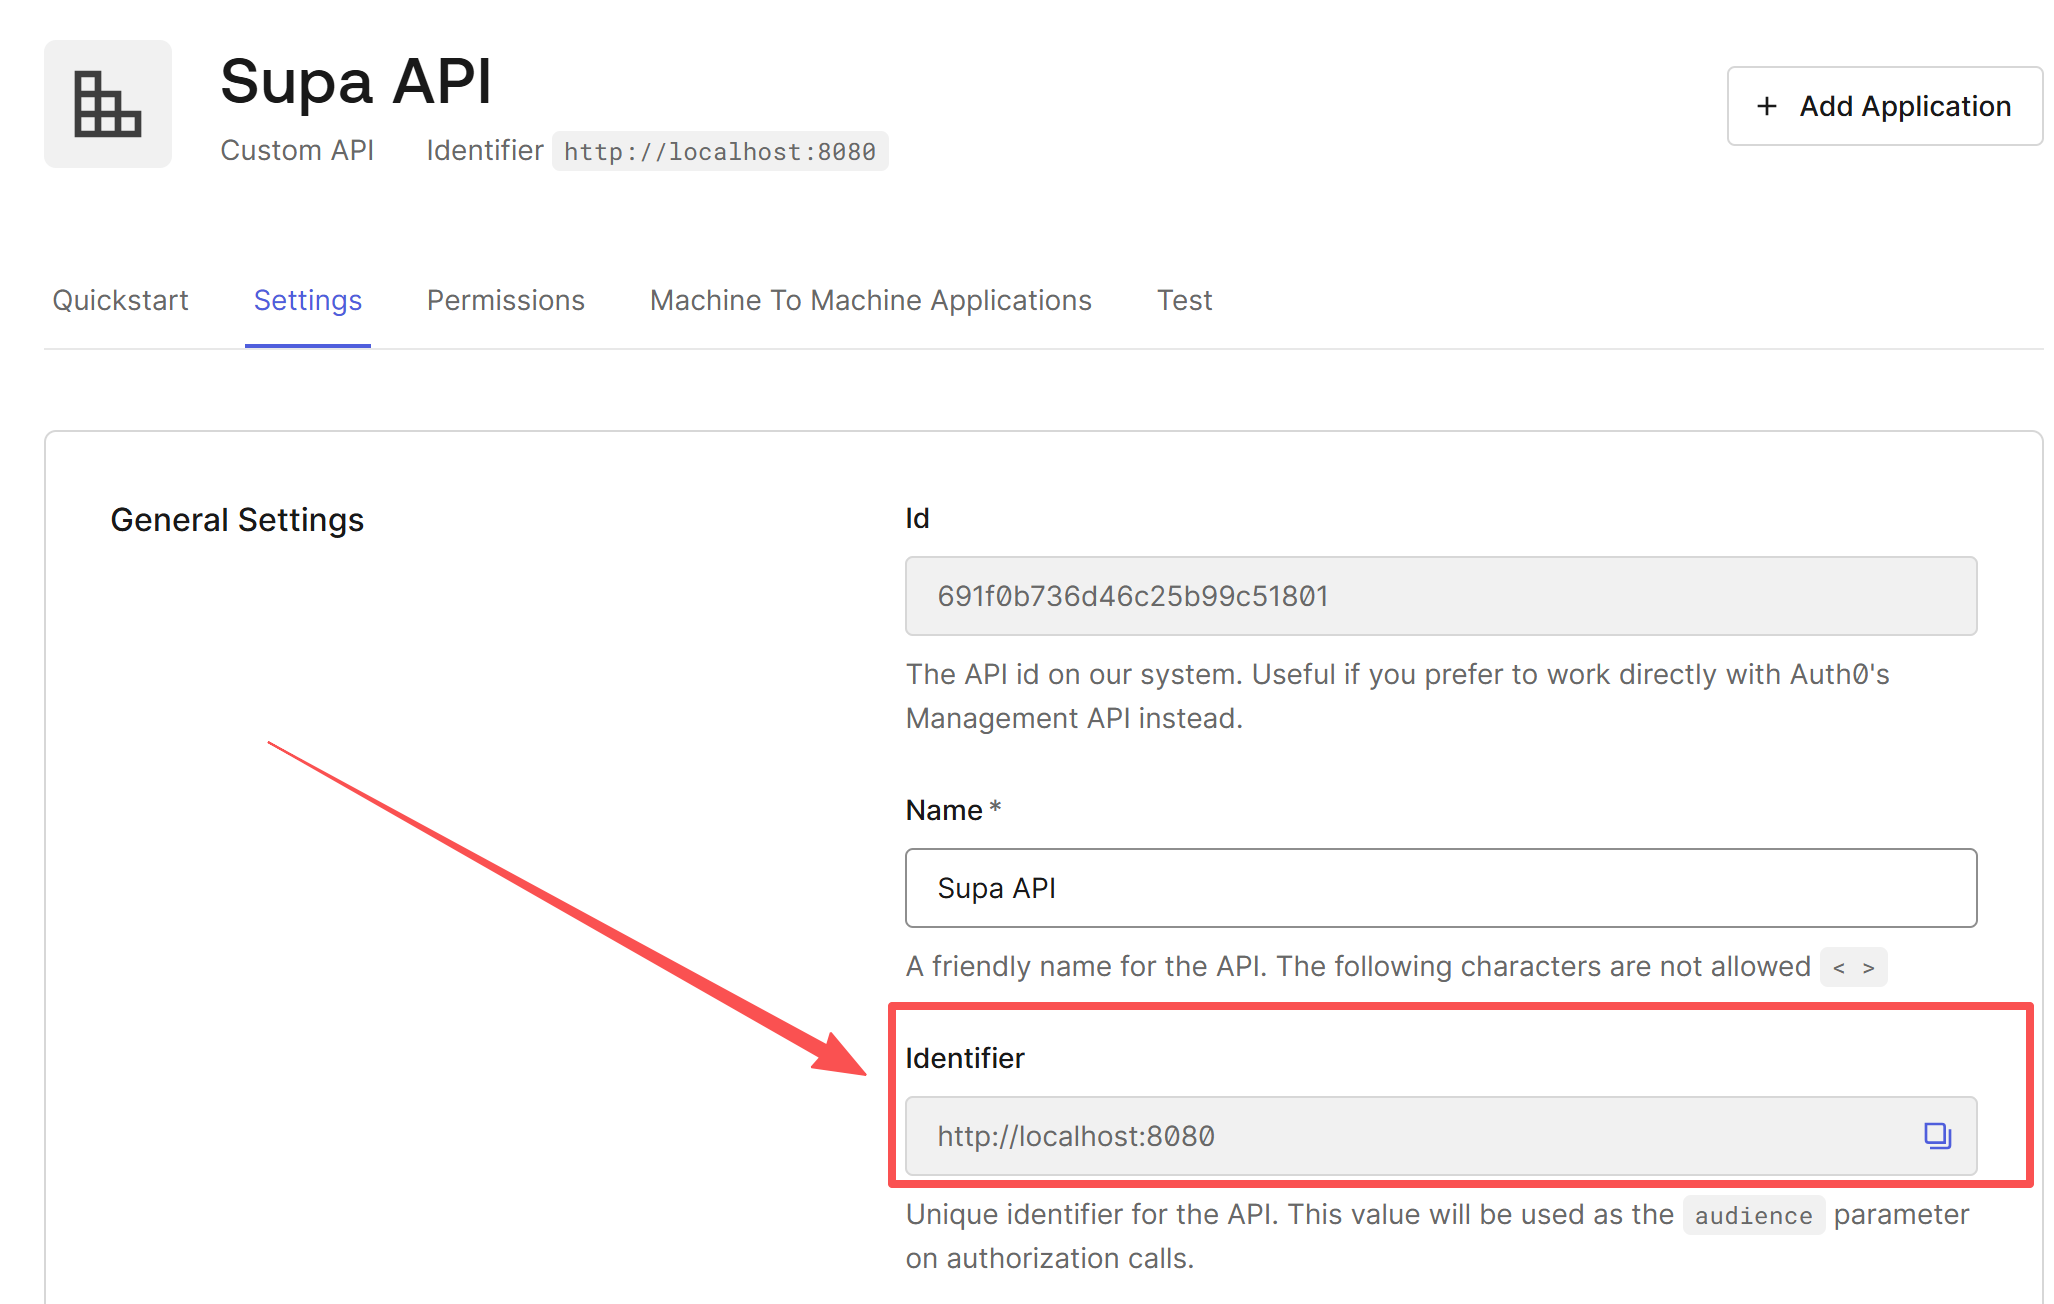
1. Create the API (Resource Server)
Go to Applications -> APIs -> Create API.
- Name:
Supa API - Identifier:
http://localhost:8080Note: This is super important. In OAuth land, this is called the audience. Even though it looks like a URL, it’s just a logical ID. It does not need to be reachable on the public internet. - Signing Algorithm: Choose
RS256.
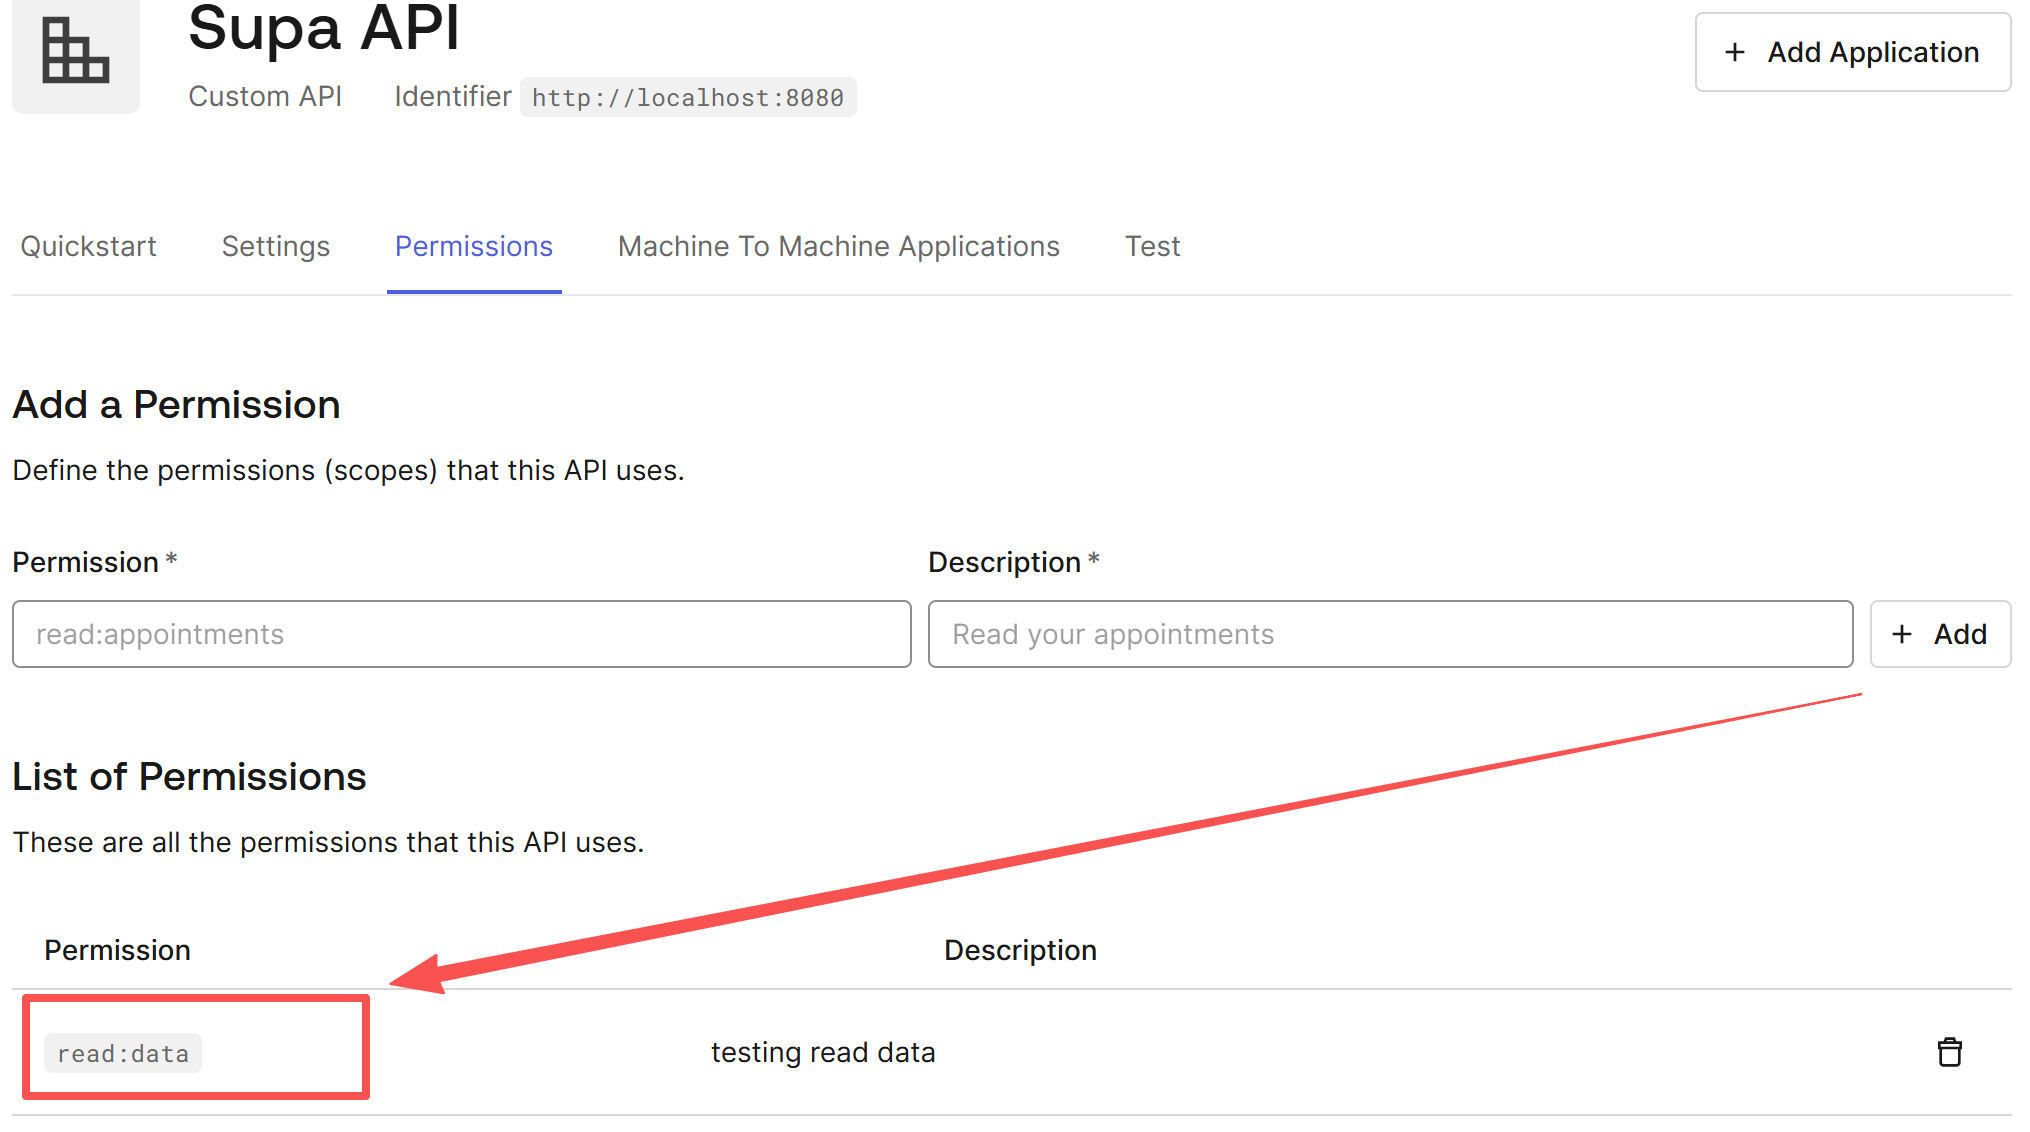
2. Define Scopes
In the API you just made, click the Permissions tab.
Let's add a permission:
- Permission (Scope):
read:data(Our Go code will specifically look for this string). - Description: testing read data
Click Add.
3. Create the M2M Application (Client)
Go to Applications -> Applications -> Create Application.
- Name:
Supa CLI. - Application Type:
Machine to Machine Applications.
Click Create.
4. Authorize
After creating the app, Auth0 will ask: "Which API does this application talk to?"
Select the Supa API we created in Step 1.
Crucial Step: Expand the menu and you will see the read:data scope. You must check this box, then click "Authorize".
The Logic: This tells Auth0 that this specific machine (App) is allowed to ask for "read" permissions.
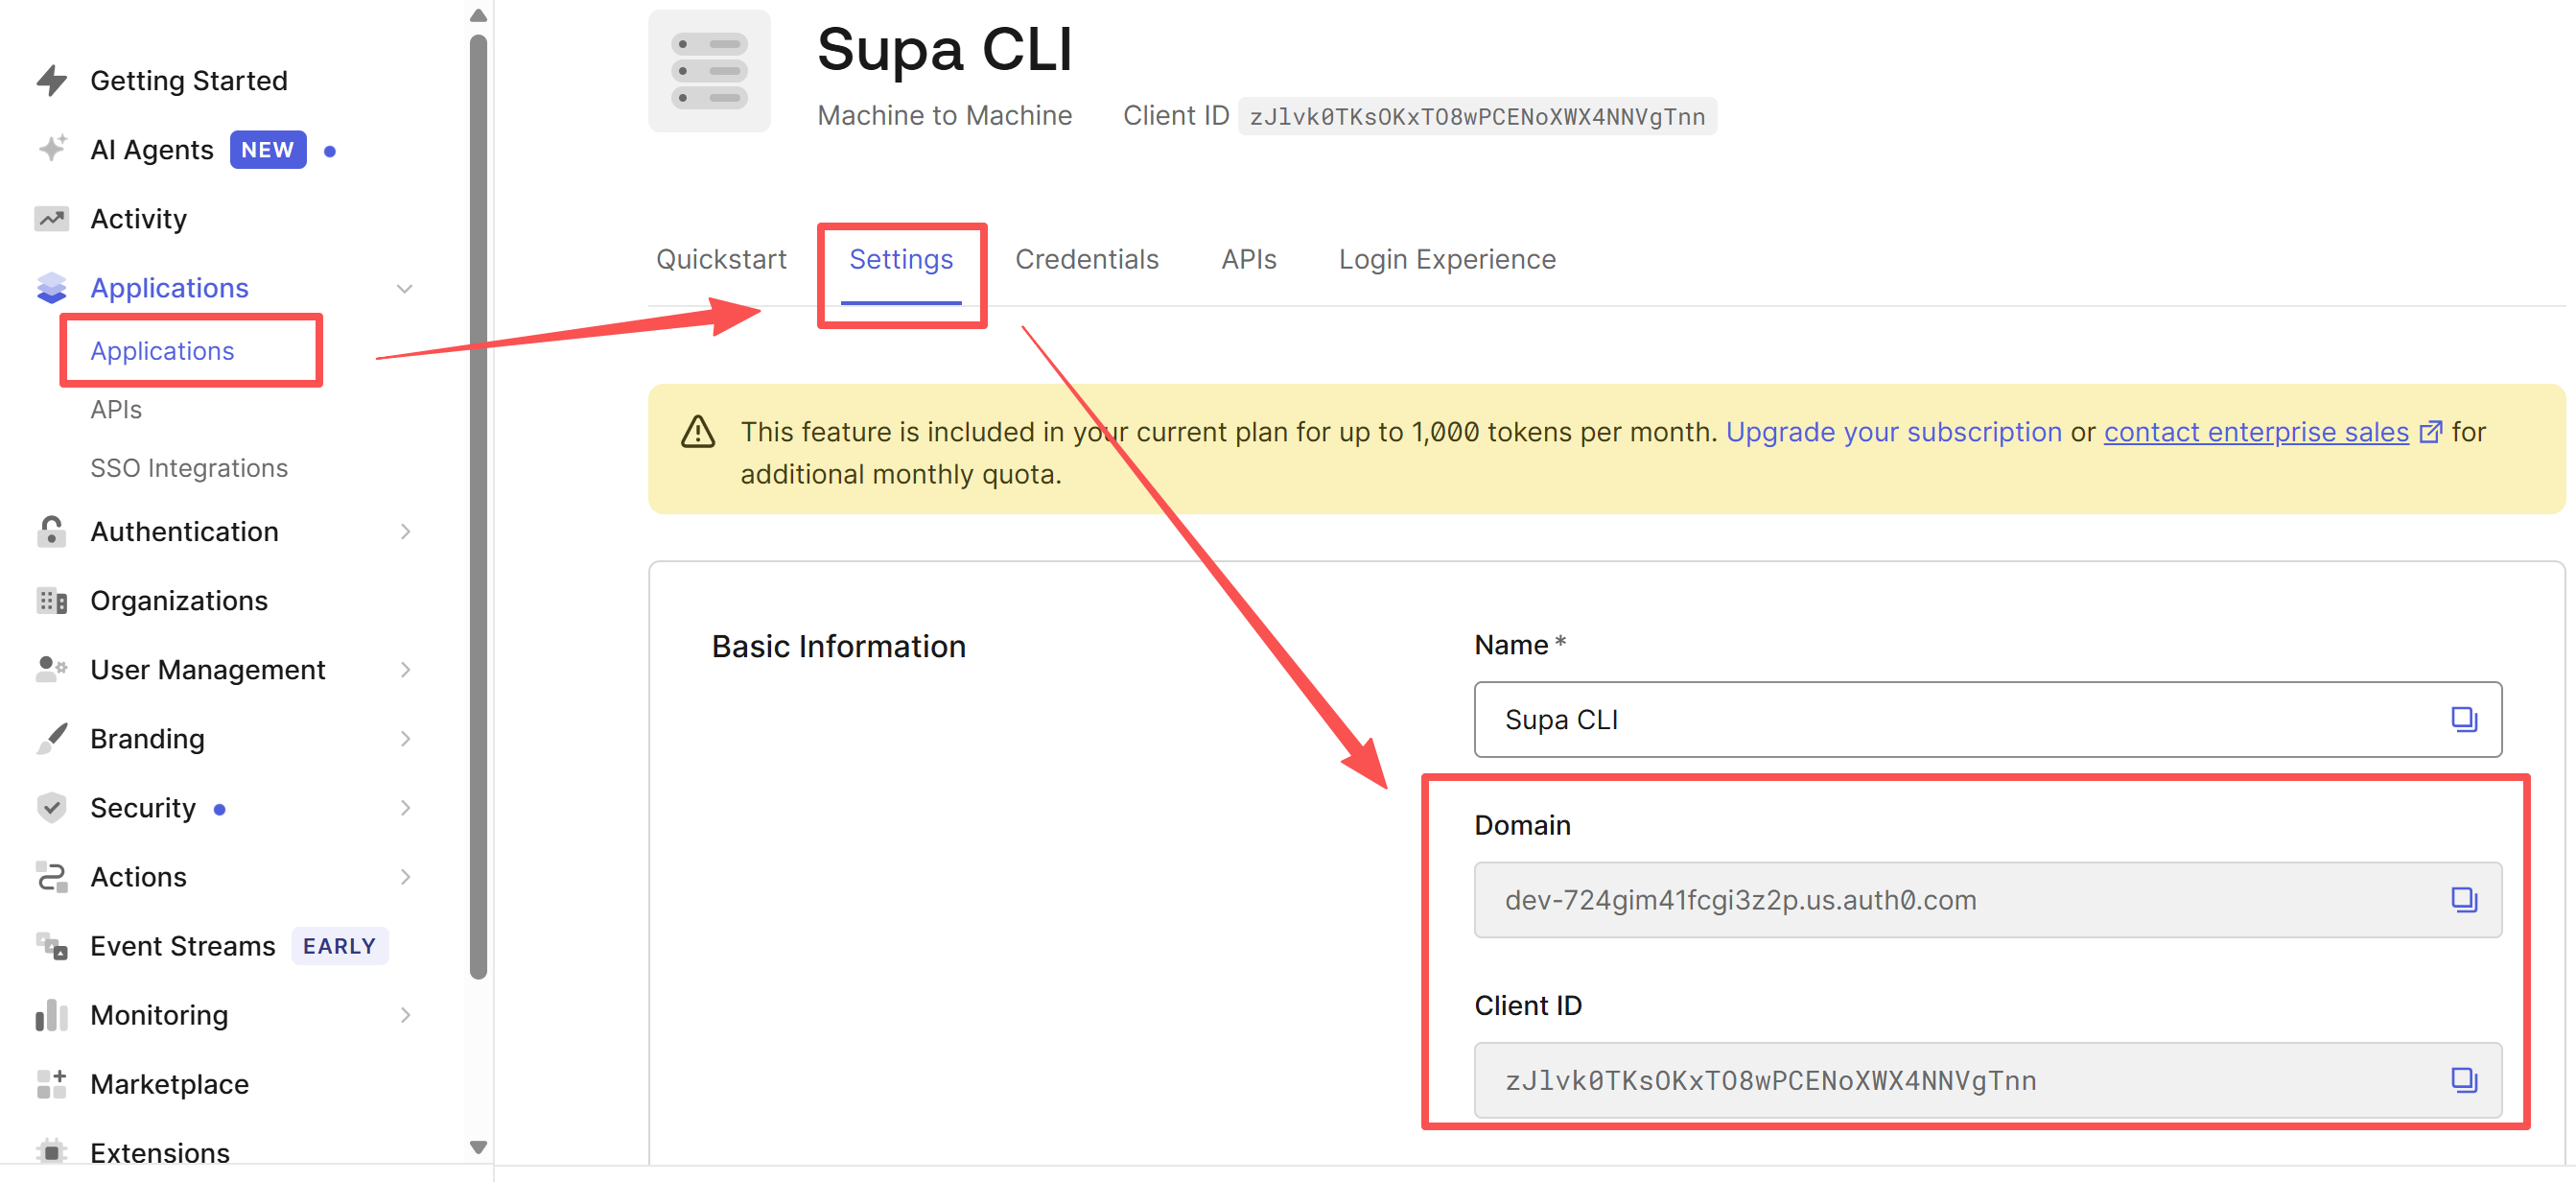
5. Get the Credentials
Go to the Settings tab of your Supa CLI application.
Copy the Domain, Client ID, and Client Secret. We need these for our Python script.
Part 2: The Downstream Service (Go + Gin)
Here is our Go service. Notice that it does not save the Client Secret. It doesn't know the password. It only cares about the Public Key (JWKS) to verify signatures.
package main

import (
	"context"
	"fmt"
	"log"
	"net/url"
	"strings"
	"time"

	"github.com/auth0/go-jwt-middleware/v2/jwks"
	"github.com/auth0/go-jwt-middleware/v2/validator"
	"github.com/gin-gonic/gin"
)

// Configuration (Fill in your Auth0 info)
const (
	Auth0Domain   = "dev-724gim41fcgi3z2p.us.auth0.com" // Replace with your Domain
	Auth0Audience = "http://localhost:8080"
)

// ensureValidToken is a middleware used to validate the Token
func ensureValidToken() gin.HandlerFunc {
	// 1. Set up JWKS provider (Fetch public keys from Auth0 to verify signatures)
	issuerURL, _ := url.Parse("https://" + Auth0Domain + "/")
	provider := jwks.NewCachingProvider(issuerURL, 5*time.Minute)

	// 2. Set up the validator
	jwtValidator, _ := validator.New(
		provider.KeyFunc,
		validator.RS256,
		issuerURL.String(),
		[]string{Auth0Audience}, // Validate that Audience matches
		validator.WithCustomClaims(func() validator.CustomClaims {
			return &CustomClaims{}
		}),
		validator.WithAllowedClockSkew(time.Minute),
	)

	return func(c *gin.Context) {
		authHeader := c.GetHeader("Authorization")
		if authHeader == "" {
			c.AbortWithStatusJSON(401, gin.H{"error": "No Authorization header"})
			return
		}

		// Remove "Bearer " prefix
		tokenString := strings.TrimPrefix(authHeader, "Bearer ")

		// 3. Validate Token
		claims, err := jwtValidator.ValidateToken(context.Background(), tokenString)
		if err != nil {
			log.Printf("Token validation failed: %v", err)
			c.AbortWithStatusJSON(401, gin.H{"error": "Invalid Token"})
			return
		}

		// 4. Validate Scope (Optional, but important in OAuth2)
		// Here we demonstrate a simple check; production environments may use more complex logic
		customClaims := claims.(*validator.ValidatedClaims).CustomClaims.(*CustomClaims)
		if !strings.Contains(customClaims.Scope, "read:data") {
			c.AbortWithStatusJSON(403, gin.H{"error": "Insufficient scope"})
			return
		}

		c.Next()
	}
}

// CustomClaims is used to parse custom fields in the Token (e.g., Scope)
type CustomClaims struct {
	Scope string `json:"scope"`
}

func (c *CustomClaims) Validate(ctx context.Context) error {
	return nil
}

func main() {
	r := gin.Default()

	// Public endpoint (No authentication required)
	r.GET("/ping", func(c *gin.Context) {
		c.JSON(200, gin.H{"message": "pong"})
	})

	// Protected endpoint (Requires OAuth2 authentication)
	protected := r.Group("/api")
	protected.Use(ensureValidToken())
	{
		protected.GET("/data", func(c *gin.Context) {
			c.JSON(200, gin.H{
				"message": "Congras! Authentication success!",
				"data":    []string{"Secret A", "Secret B"},
			})
		})
	}

	fmt.Println("Server running on http://localhost:8080")
	r.Run(":8080")
}
Part 3: The Upstream Client (Python)
The Python script acts as the upstream microservice. Its job is to trade the Client Credentials for a Token, and then use that Token to knock on Go's door.
import requests
import sys

# Configuration (Copy from Auth0 Application Settings)
AUTH0_DOMAIN = "dev-724gim41fcgi3z2p.us.auth0.com"
CLIENT_ID = "zJlvk0TKsOKxTO8w..."
CLIENT_SECRET = "i1v5lGTJOVFc..."
AUDIENCE = "http://localhost:8080" # Must match the one in Go Server

def get_access_token():
    """
    Step 1: Request Token from Auth0
    """
    url = f"https://{AUTH0_DOMAIN}/oauth/token"

    payload = {
        "client_id": CLIENT_ID,
        "client_secret": CLIENT_SECRET,
        "audience": AUDIENCE,
        "grant_type": "client_credentials"
        # Scope is optional here. If omitted, Auth0 grants all allowed scopes for this Client.
        # You can also specify: "scope": "read:data"
    }

    headers = {'content-type': "application/json"}

    print(f"Requesting Token from {url}...")
    response = requests.post(url, json=payload, headers=headers)

    if response.status_code != 200:
        print(f"Failed to retrieve Token: {response.text}")
        sys.exit(1)

    data = response.json()
    print("Token retrieved successfully!")
    return data['access_token']

def call_api(token):
    """
    Step 2: Access local Go Server with Token
    """
    api_url = "http://localhost:8080/api/data"

    headers = {
        "Authorization": f"Bearer {token}"
    }

    print(f"\nCalling API: {api_url} ...")
    response = requests.get(api_url, headers=headers)

    if response.status_code == 200:
        print("\n=== Call successful! ===")
        print("Server response:", response.json())
    else:
        print(f"\n=== Call failed [{response.status_code}] ===")
        print("Server response:", response.text)

if __name__ == "__main__":
    # 1. Get Token
    token = get_access_token()

    # 2. (Optional) Print Token to see what it looks like
    # You can paste this token into jwt.io to decode and view contents
    print("-" * 60)
    print("Access Token:")
    print(token)
    print("-" * 60)

    # 3. Call Interface
    call_api(token)
Part 4: JWKS & The Magic of Rotation
You might be wondering: "Wait, the Go server doesn't have the password. How does it know the Token isn't fake?"
This is where JWKS (JSON Web Key Set) comes in to save the day.
1. What is JWKS?
JWKS isn't a file you download manually. It's a public endpoint hosted by Auth0. When our Go program starts, it quietly visits a URL like this in the background:
https://dev-724gim41fcgi3z2p.us.auth0.com/.well-known/jwks.json
And it downloads a list of public keys that looks like this:
{
  "keys": [
    {
      "kty": "RSA",
      "use": "sig",
      "n": "4CemFJ7TlHiramjrCuL-RU=..bala",
      "e": "AQAB",
      "kid": "zNzOehS3IyrE_affVCCbV",
      "x5t": "Y22Fn3PK4_hPu_DbjbaBdwquCh8",
      "x5c": [
        "MIIDHTCCAgW...wwHVUEUpmL...bala"
      ],
      "alg": "RS256"
    },
    {
      "kty": "RSA",
      "use": "sig",
      "n": "lM3Xs6f4kW...bala",
      "e": "AQAB",
      "kid": "GhlB5qAXm3pI1C8dXhag1",
      "x5t": "t7RmMk_OungUDOxDjxVgFBuNSg0",
      "x5c": [
        "MIIDHTCCAgWgAw...RjUlHTLoPmucCC...bala"
      ],
      "alg": "RS256"
    }
  ]
}
The Logic:
- The Token from Python has a kid (Key ID) in its Header.

- Go looks at that
kid, finds the matching Public Key in the list above. - Go uses the
nandevalues to mathematically verify the signature.
2. Caching (Don't kill the server)
"If Go downloads this JSON on every request, won't Auth0 explode?"
Good question. That's why we have this line in the Go code:
provider := jwks.NewCachingProvider(issuerURL, 5*time.Minute)
- First Request: Download the keys, store in RAM.
- Next 5 Minutes: Use RAM. This is microsecond-level fast.
- After 5 Minutes: Cache expires. Download again.
3. The Killer Feature: Key Rotation (Zero Downtime)
This is why JWKS beats "Hand-Crafted Tokens."
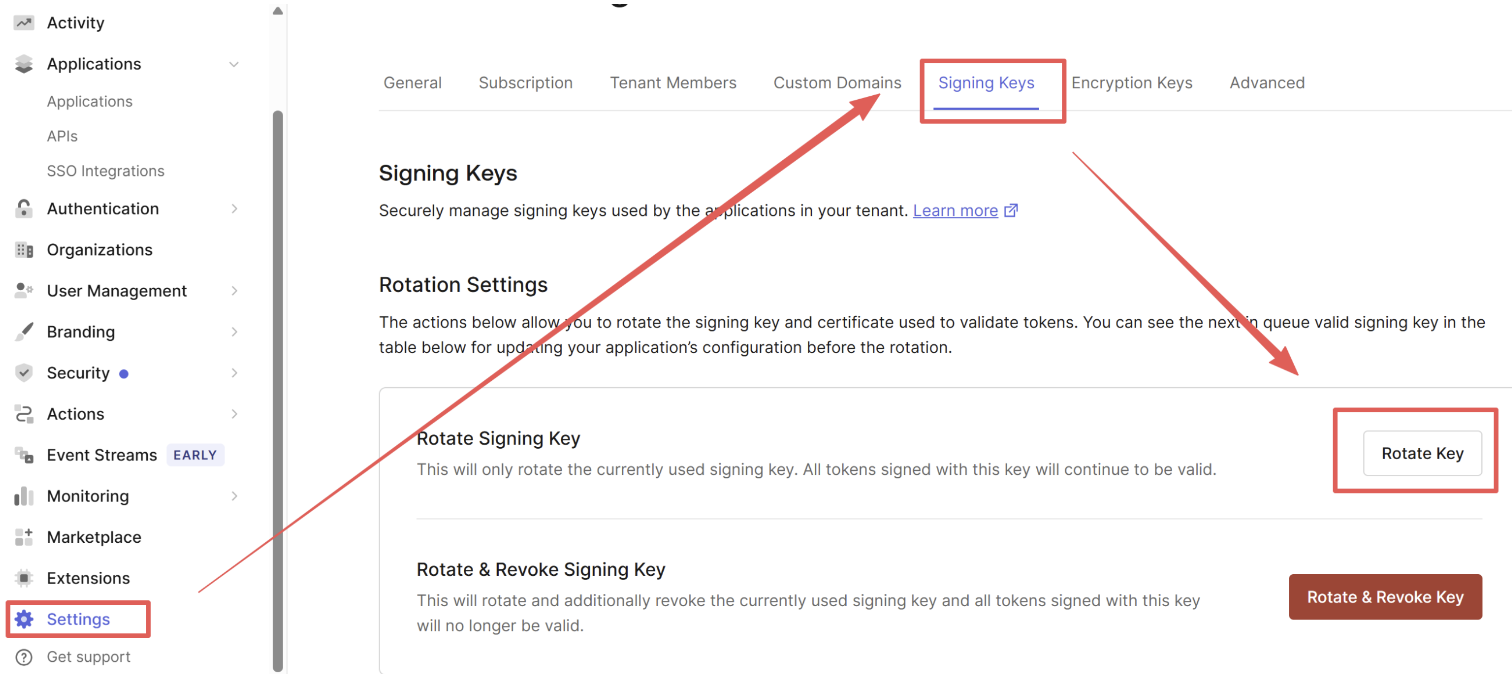
If we need to rotate the keys (maybe for compliance, or maybe because someone pasted the private key on StackOverflow):
- Auth0 generates a New pair of keys.
- Auth0 puts the New Public Key in the jwks.json list, but keeps the Old Public Key there too.
- Auth0 starts signing new tokens with the New Private Key.
- The Go service downloads the updated list (within 5 mins).
- Because the list has both keys, Go can verify both old tokens (valid until they expire) and new tokens.
So, we just changed the entire security foundation without changing a single line of code or restarting a single server.
4. Seeing it in action
I triggered a rotation in Auth0:
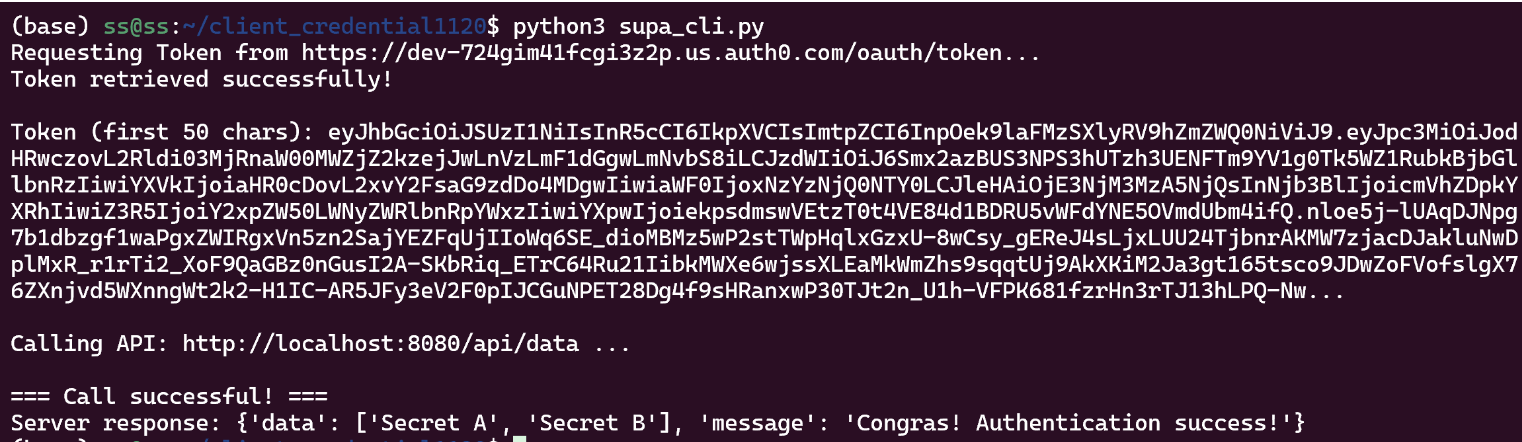
I ran the client again without changing code:
(base) ss@ss:~/client_credential1120$ python3 supa_cli.py
Requesting Token from https://dev-724gim41fcgi3z2p.us.auth0.com/oauth/token...
Token retrieved successfully!
------------------------------------------------------------
Access Token:
eyJhbGciOiJSUzI1NiIsInR5cCI6IkpXVCIsImt...blabla
------------------------------------------------------------

Calling API: http://localhost:8080/api/data ...

=== Call successful! ===
Server response: {'data': ['Secret A', 'Secret B'], 'message': 'Congras! Authentication success!'}
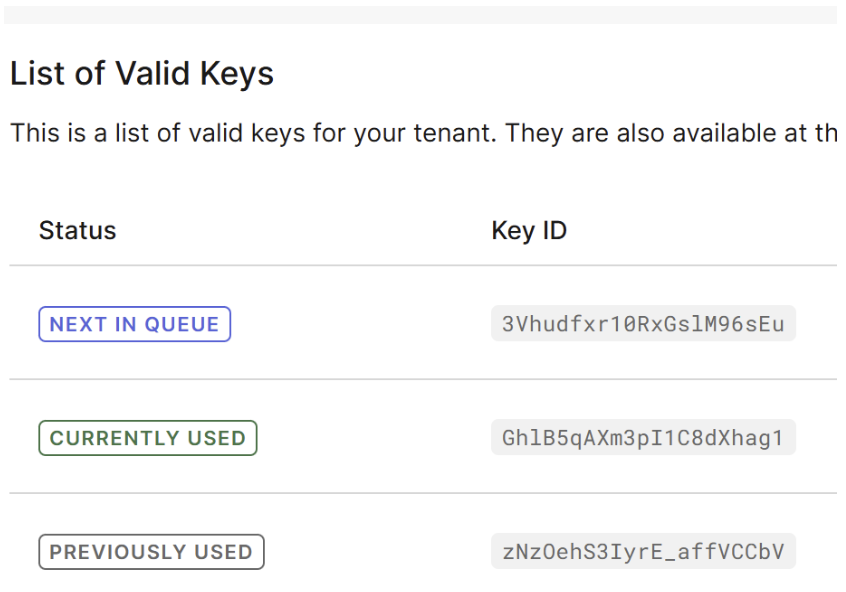
Look closely, the kid has changed automatically:
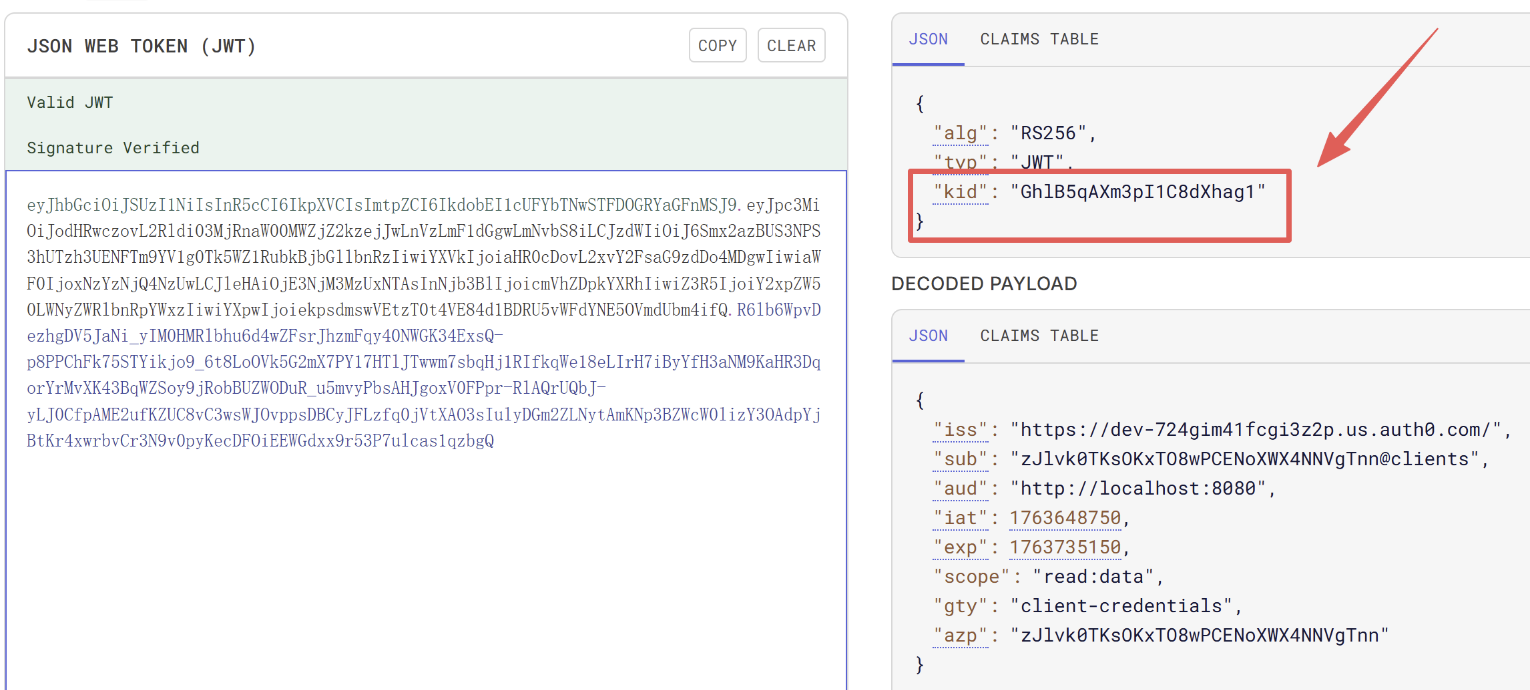
And verified in the backend:
Running Result
Appendix: Doing the Math (For the curious)
I mentioned that we use n (Modulus) and e (Exponent) to restore the RSA Public Key and verify the signature. If you don't trust the library and want to see the math yourself, here is a Python script I wrote to manually verify the JWT.
import base64
import json
from cryptography.hazmat.primitives.asymmetric import rsa
from cryptography.hazmat.primitives import serialization
from cryptography.hazmat.primitives import hashes
from cryptography.hazmat.primitives.asymmetric import padding
from cryptography.hazmat.backends import default_backend
# ================= Configuration Area =================
# 1. Paste your full Token here
TOKEN = "eyJhbGciO..."
# 2. Paste the corresponding n and e values found in jwks.json
# Note: Must match the key pair corresponding to the kid in the Token Header
N_VALUE = "4CemFJ7TlHiram..." # This is a very long string
E_VALUE = "AQAB" # Usually very short
# ======================================================
def base64_to_int(data_str):
"""
Helper function: Convert Base64URL string to Integer (Big Integer)
Principle: Base64 -> Bytes -> Integer
"""
# 1. Add Base64 padding ('=') to avoid decoding errors
padding_len = 4 - (len(data_str) % 4)
if padding_len < 4:
data_str += "=" * padding_len
# 2. Base64URL decode to bytes
decoded_bytes = base64.urlsafe_b64decode(data_str)
# 3. Convert bytes to Big Integer (Big Endian)
return int.from_bytes(decoded_bytes, byteorder='big')
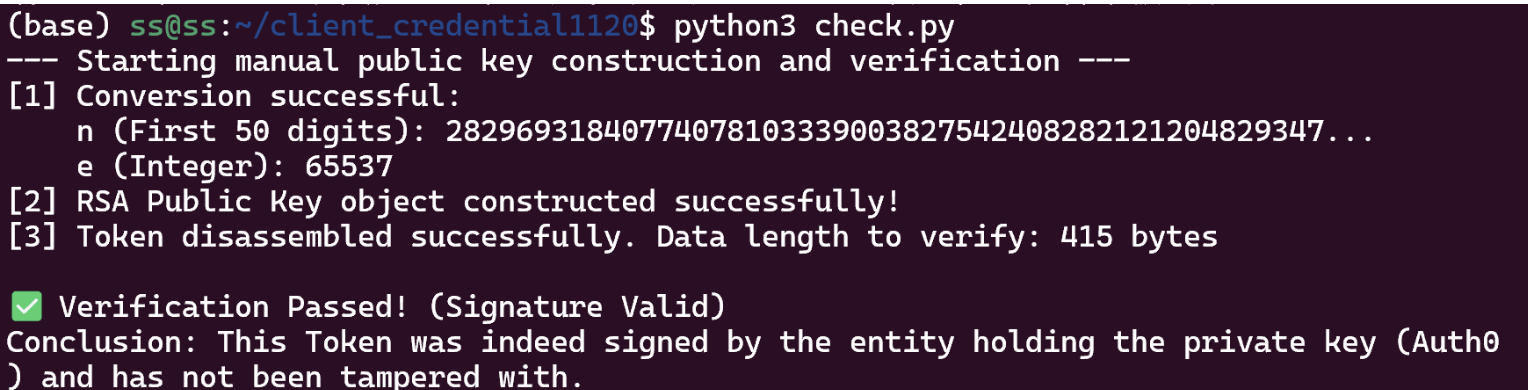
def manual_verify():
print("--- Starting manual public key construction and verification ---")
# Step 1: Reconstruct RSA Public Key Object
# This is a purely mathematical process: Public Key = (n, e)
try:
n_int = base64_to_int(N_VALUE)
e_int = base64_to_int(E_VALUE)
print(f"[1] Conversion successful:")
print(f" n (First 50 digits): {str(n_int)[:50]}...")
print(f" e (Integer): {e_int}")
# Use the cryptography library to assemble n and e into a public key object
public_numbers = rsa.RSAPublicNumbers(e_int, n_int)
public_key = public_numbers.public_key(default_backend())
print("[2] RSA Public Key object constructed successfully!")
except Exception as e:
print(f"Public key reconstruction failed: {e}")
return
# Step 2: Disassemble Token
# JWT Format: Header.Payload.Signature
parts = TOKEN.split('.')
if len(parts) != 3:
print("Invalid Token format")
return
# The signature is also Base64URL encoded and needs to be decoded into raw bytes
header_payload = parts[0] + '.' + parts[1] # This is the original content that was signed (Message)
signature_b64 = parts[2]
# Add padding and decode signature
sig_padding = 4 - (len(signature_b64) % 4)
if sig_padding < 4:
signature_b64 += "=" * sig_padding
signature_bytes = base64.urlsafe_b64decode(signature_b64)
print(f"[3] Token disassembled successfully. Data length to verify: {len(header_payload)} bytes")
# Step 3: Perform Mathematical Signature Verification
# Algorithm: RS256 (RSA Signature + SHA256 Hash)
try:
public_key.verify(
signature_bytes, # The real signature (Encrypted Hash)
header_payload.encode('ascii'), # Original content (We calculate the Hash ourselves)
padding.PKCS1v15(), # JWT standard uses PKCS1 v1.5 padding
hashes.SHA256() # JWT standard uses SHA256
)
print("\n✅ Verification Passed! (Signature Valid)")
print("Conclusion: This Token was indeed signed by the entity holding the private key (Auth0) and has not been tampered with.")
except Exception as e:
print("\n❌ Verification Failed! (Signature Invalid)")
print(f"Error details: {e}")
print("Possible reasons:")
print("1. Incorrect n or e copied (must match kid)")
print("2. Incomplete Token copied")
print("3. Token content has been modified")
if __name__ == "__main__":
manual_verify()
The Result: