- Published on
Bastion Hosts: Safeguarding Your Cloud Resources
- Authors

- Name
- Ted
- @supasaf
A Note from the Future (Reviewed in 2025)
Hey there! This article was originally written in 2023 and is a fantastic step-by-step guide to understanding the concept of a bastion host and building the required network infrastructure (VPCs, subnets, security groups) with Terraform. The principles here are solid.
However, as cloud security evolves, so do our best practices. For a real-world production environment in 2025, I strongly recommend not leaving an SSH port open 24/7, even on a bastion host.
The modern, more secure approach is to use Just-in-Time (JIT) VM access. Services like AWS Systems Manager Session Manager allow you to get temporary, on-demand, and fully audited command-line access to your private instances without ever exposing the SSH port. The guiding principle is that production servers shouldn't need to run the sshd service at all.
So, please enjoy this article as a great hands-on lab for learning about cloud networking. Just remember to reach for JIT access when you're building for production!
Editor's Note: The original 2023 article begins below.
In the world of cloud computing, security is paramount. As organizations embrace the cloud, it becomes crucial to implement robust strategies to protect valuable resources from unauthorized access. One essential aspect of cloud security is the bastion host – a dedicated server that acts as a secure gateway, ensuring the protection of private resources within your network. In this blog post, we'll explore the concept of bastion hosts, understand their significance in cloud security, and demonstrate how to set up a bastion host using Terraform in AWS. We'll also create a private RDS instance to serve as the target server, enhancing your security measures.
So, what Exactly is a Bastion Host?
A bastion host, also known as a jump server or a bastion server, is a specialized server that acts as a secure entry point into a private network. Its primary role is to serve as a single access point, granting authorized users secure access to other resources within the network, such as databases or private instances. By implementing a bastion host, organizations can establish strict access controls, closely monitor and log access attempts, and significantly reduce the attack surface area.
The Crucial Role of Bastion Hosts in Cloud Security
Integrating bastion hosts into your cloud security strategy offers several key benefits:
Secure Remote Access:
Bastion hosts enable secure remote access to private resources. Instead of exposing sensitive resources directly to the internet, users must first connect to the bastion host, which acts as a secure gateway. This additional layer of protection significantly reduces the risk of unauthorized access.
Access Control:
With bastion hosts, organizations can enforce stringent access control policies. Only authorized users with the appropriate credentials and permissions can access the bastion host. From there, they can authenticate and access other resources within the private network. This helps prevent unauthorized users from directly accessing sensitive resources.
Monitoring and Logging:
By channeling all access attempts through the bastion host, organizations gain effective monitoring and logging capabilities. Valuable audit trails are generated, allowing organizations to track who accessed which resources and when. These logs are invaluable for forensic analysis and investigations during security incidents.
Reduced Attack Surface:
Bastion hosts act as a single point of entry into the private network, effectively reducing the overall attack surface area. By limiting external access solely to the bastion host, organizations gain better control and security for their resources. This isolation mitigates the risk of direct attacks on private instances or databases.
Setting up a Bastion Host in AWS Using Terraform
Now, let's delve into setting up a bastion host in AWS using Terraform. We'll create an EC2 instance to serve as the bastion host, which will be located in a public subnet. Additionally, we'll create a private RDS instance to act as the target server, residing in a private subnet.
VPC
To begin, we need create the AWS VPC, we'll define the necessary resources in our Terraform configuration file, typically named variables.tf:
variable "aws_region" {
  default = "us-west-2"
}

// This variable is to set the
// CIDR block for the VPC
variable "vpc_cidr_block" {
  description = "CIDR block for VPC"
  type        = string
  default     = "10.0.0.0/16"
}
And the main.tf:
terraform {
  required_providers {
    aws = {
      source  = "hashicorp/aws"
      version = "~> 4.16"
    }
  }

  required_version = ">= 1.2.0"
}

provider "aws" {
  region = var.aws_region
}

data "aws_availability_zones" "available" {
  state = "available"
}

resource "aws_vpc" "ec2_rds_vpc" {
  cidr_block           = var.vpc_cidr_block
  enable_dns_hostnames = true

  tags = {
    Name = "ec2_rds_vpc"
  }
}
Once you have the configuration file set up, run the following commands to initialize Terraform and apply the configuration:
terraform init
terraform apply
We may double check from the AWS console as:
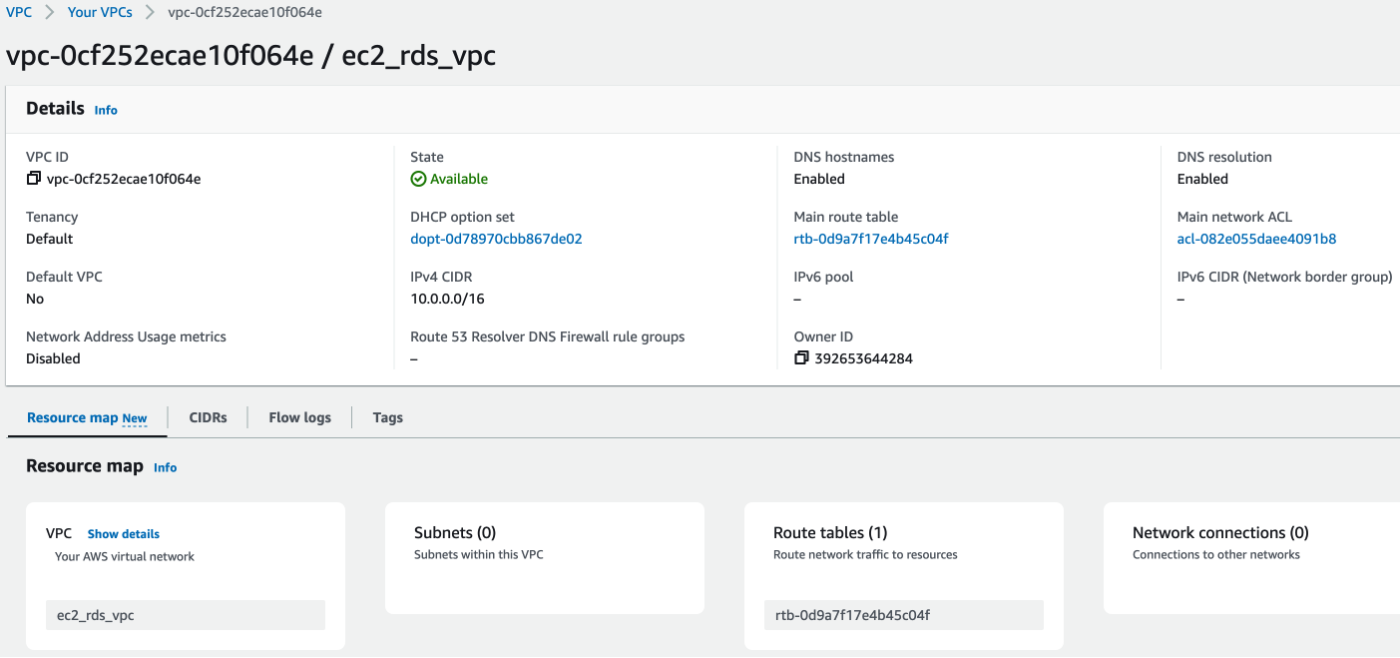
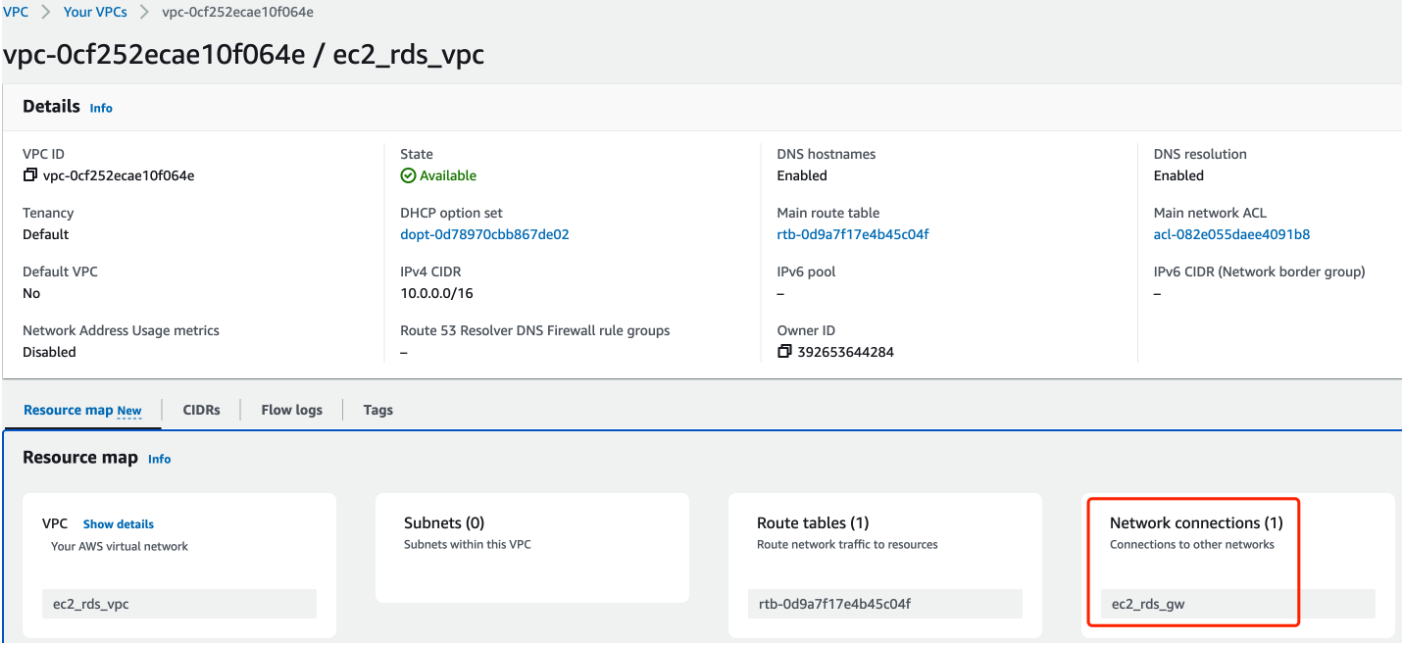
Create AWS gateway(main.tf):
resource "aws_internet_gateway" "ec2_rds_gw" {
  vpc_id = aws_vpc.ec2_rds_vpc.id

  tags = {
    Name = "ec2_rds_gw"
  }
}
We can see the Network connections became 1!
RDS needs both public and private subnets(variables.tf),
variable "subnet_count" {
  description = "Number of subnets"
  type        = map(number)
  default = {
    public  = 1,
    private = 2
  }
}

variable "public_subnet_cidr_blocks" {
  description = "Available CIDR blocks for public subnets"
  type        = list(string)
  default = [
    "10.0.1.0/24",
    "10.0.2.0/24",
    "10.0.3.0/24",
    "10.0.4.0/24"
  ]
}

variable "private_subnet_cidr_blocks" {
  description = "Available CIDR blocks for private subnets"
  type        = list(string)
  default = [
    "10.0.101.0/24",
    "10.0.102.0/24",
    "10.0.103.0/24",
    "10.0.104.0/24",
  ]
}
Along with main.tf:
resource "aws_subnet" "ec2rds_public_subnet" {
  count = var.subnet_count.public
  vpc_id = aws_vpc.ec2_rds_vpc.id

  // "10.0.1.0/24"
  cidr_block = var.public_subnet_cidr_blocks[count.index]

  // our region is us-west-2, this should grab us-west-2a
  availability_zone = data.aws_availability_zones.available.names[count.index]

  tags = {
    Name = "ec2rds_public_subnet_${count.index}"
  }
}

resource "aws_subnet" "ec2rds_private_subnet" {
  count = var.subnet_count.private
  vpc_id = aws_vpc.ec2_rds_vpc.id

  // "10.0.102.0/24"
  cidr_block = var.private_subnet_cidr_blocks[count.index]

  // our region is us-west-2, this should grab us-west-2b
  availability_zone = data.aws_availability_zones.available.names[count.index]

  tags = {
    Name = "ec2rds_private_subnet_${count.index}"
  }
}
OK, the number of Subnets became 3:
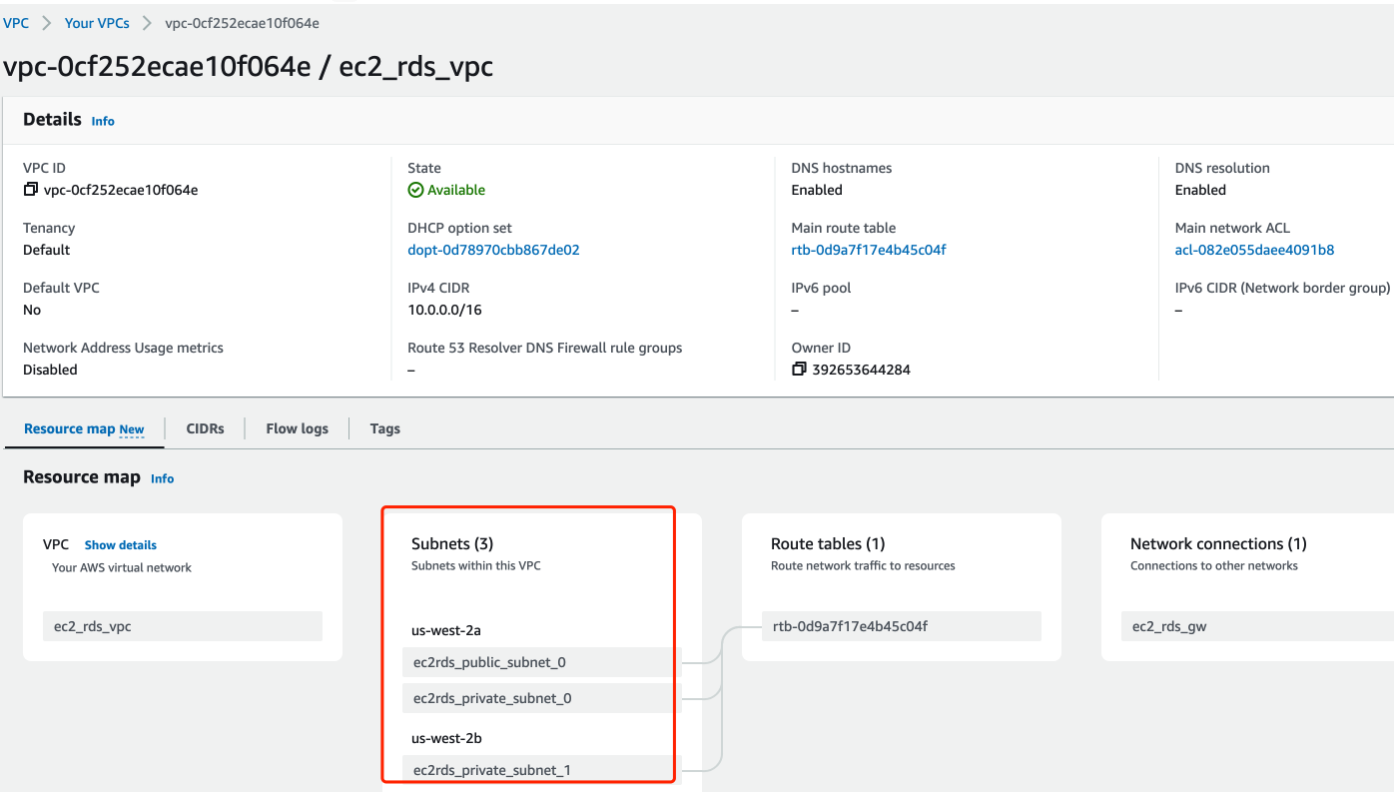
The next step is to create Route Tables(main.tf):
resource "aws_route_table" "ec2rds_public_rt" {
  vpc_id = aws_vpc.ec2_rds_vpc.id

  route {
    // "0.0.0.0/0" means anywhere on the internet can access
    cidr_block = "0.0.0.0/0"
    gateway_id = aws_internet_gateway.ec2_rds_gw.id
  }
}

resource "aws_route_table_association" "public" {
  count          = var.subnet_count.public
  route_table_id = aws_route_table.ec2rds_public_rt.id
  subnet_id      = aws_subnet.ec2rds_public_subnet[count.index].id
}

resource "aws_route_table" "ec2rds_private_rt" {
  vpc_id = aws_vpc.ec2_rds_vpc.id

  // We don't need to setup `route` for private route table
}

resource "aws_route_table_association" "private" {
  count          = var.subnet_count.private
  route_table_id = aws_route_table.ec2rds_private_rt.id
  subnet_id      = aws_subnet.ec2rds_private_subnet[count.index].id
}
Route tables will connect the gateway if all goes well:
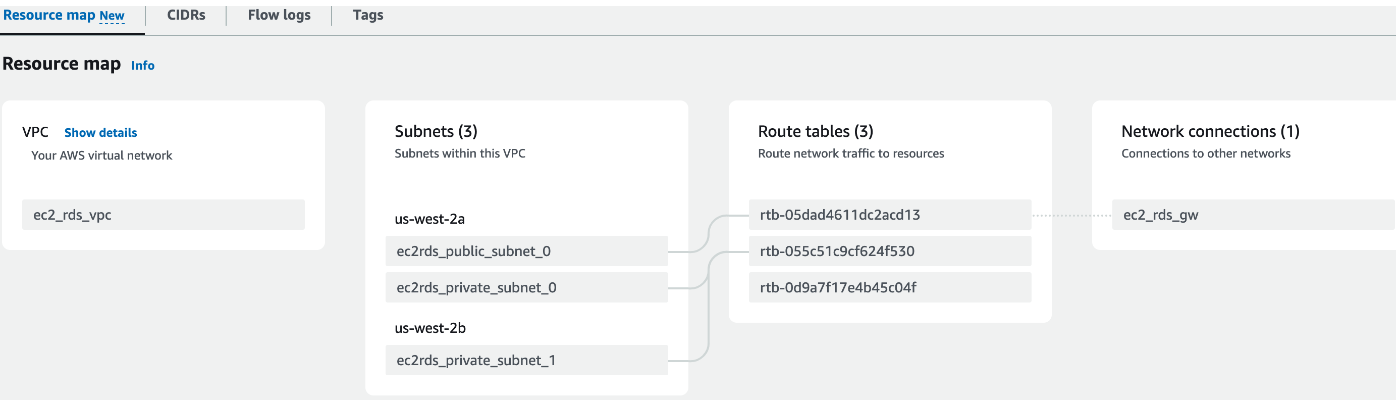
Take a breath, we are going the setup the Security Groups now(variables.tf):
variable "my_ip" {
  default = "CHANGE_IT_TO_YOUR_IP" // change it to your IP!
}
And main.tf:
resource "aws_security_group" "ec2rds_web_sg" {
  name        = "ec2rds_web_sg"
  description = "Security group for tutorial web servers"
  vpc_id      = aws_vpc.ec2_rds_vpc.id

  // Only my IP can access port 22(SSH)
  ingress {
    description = "Allow SSH from my computer"
    from_port   = "22"
    to_port     = "22"
    protocol    = "tcp"
    // This is using the variable "my_ip"
    cidr_blocks = ["${var.my_ip}/32"]
  }

  egress {
    description = "Allow all outbound traffic"
    from_port   = 0
    to_port     = 0
    protocol    = "-1"
    cidr_blocks = ["0.0.0.0/0"]
  }

  tags = {
    Name = "ec2rds_web_sg"
  }
}

resource "aws_security_group" "ec2rds_db_sg" {
  name        = "ec2rds_db_sg"
  description = "Security group for tutorial databases"
  vpc_id      = aws_vpc.ec2_rds_vpc.id

  // Only allow access from bastion server
  ingress {
    description     = "Allow MySQL traffic from only the web sg"
    from_port       = "3306"
    to_port         = "3306"
    protocol        = "tcp"
    security_groups = [aws_security_group.ec2rds_web_sg.id]
  }

  tags = {
    Name = "ec2rds_db_sg"
  }
}
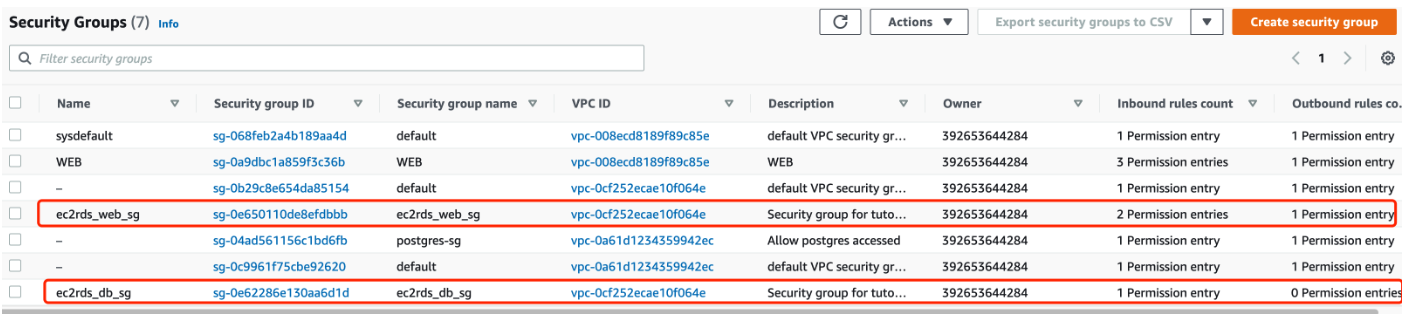
Well, that the security groups should look like from AWS console:
RDS
RDS is simple, we need to setup DB Subnet Group(main.tf):
resource "aws_db_subnet_group" "ec2rds_db_subnet_group" {
  name        = "ec2rds_db_subnet_group"
  description = "DB subnet group for tutorial"
  subnet_ids  = [for subnet in aws_subnet.ec2rds_private_subnet : subnet.id]
}
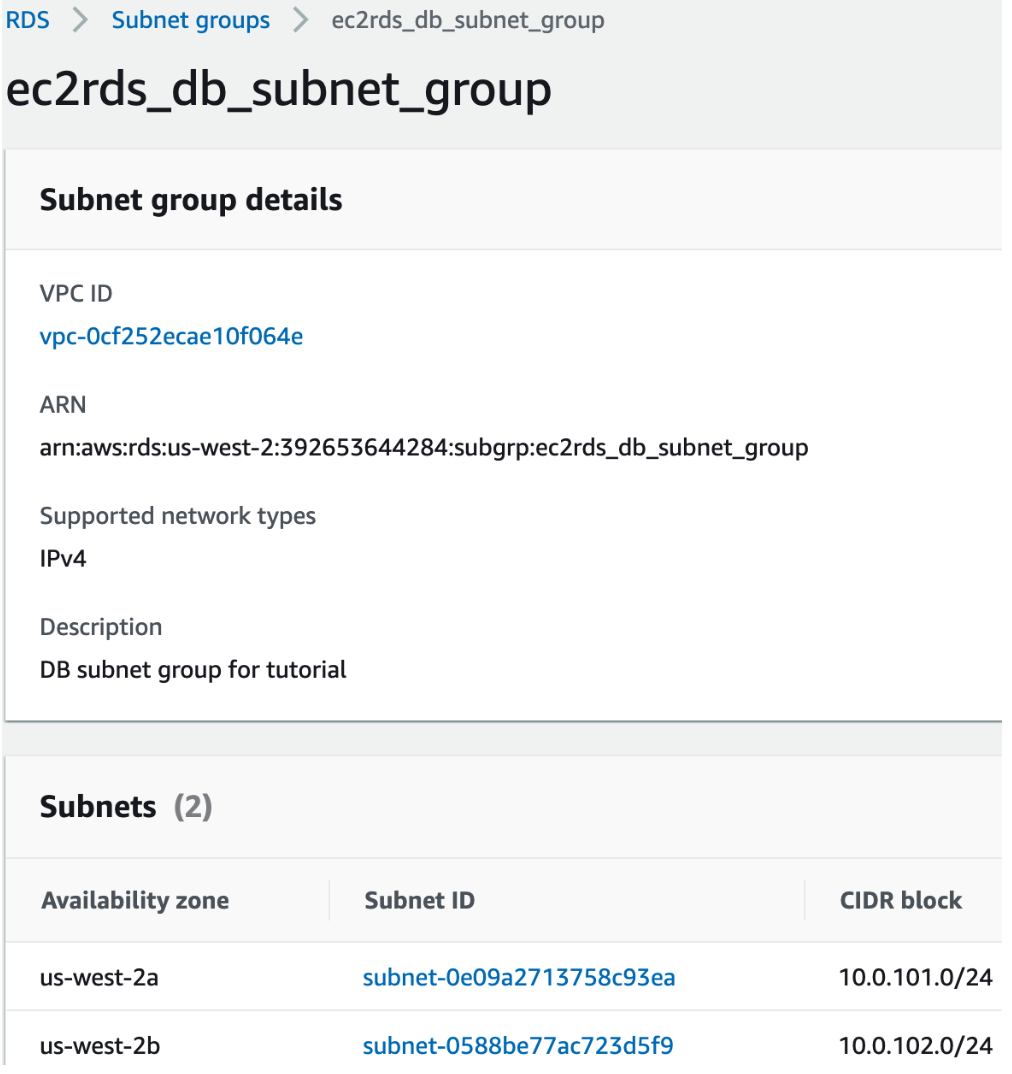
The RDS' subnet group is connecting to VPC private subnets now:
Create DB(variables.tf):
variable "db_username" {
  description = "Database master user"
  type        = string
  default     = "mmuser"
}

variable "db_password" {
  description = "Database master user password"
  type        = string
  sensitive   = true
}

variable "settings" {
  description = "Configuration settings"
  type        = map(any)
  default = {
    "database" = {
      allocated_storage   = 10            // storage in gigabytes
      engine              = "mysql"       // engine type
      engine_version      = "8.0.27"      // engine version
      instance_class      = "db.t2.micro" // rds instance type
      db_name             = "mmdb"        // database name
      skip_final_snapshot = true
    },
    "web_app" = {
      count         = 1          // the number of EC2 instances
      instance_type = "t2.micro" // the EC2 instance
    }
  }
}
Together with main.tf:
resource "aws_db_instance" "ec2rds_db" {
  allocated_storage = var.settings.database.allocated_storage
  engine = var.settings.database.engine
  engine_version = var.settings.database.engine_version

  // "db.t2.micro"
  instance_class = var.settings.database.instance_class
  db_name = var.settings.database.db_name
  username = var.db_username
  password = var.db_password

  // "ec2rds_db_subnet_group"
  db_subnet_group_name = aws_db_subnet_group.ec2rds_db_subnet_group.name
  vpc_security_group_ids = [aws_security_group.ec2rds_db_sg.id]
  skip_final_snapshot = var.settings.database.skip_final_snapshot
}
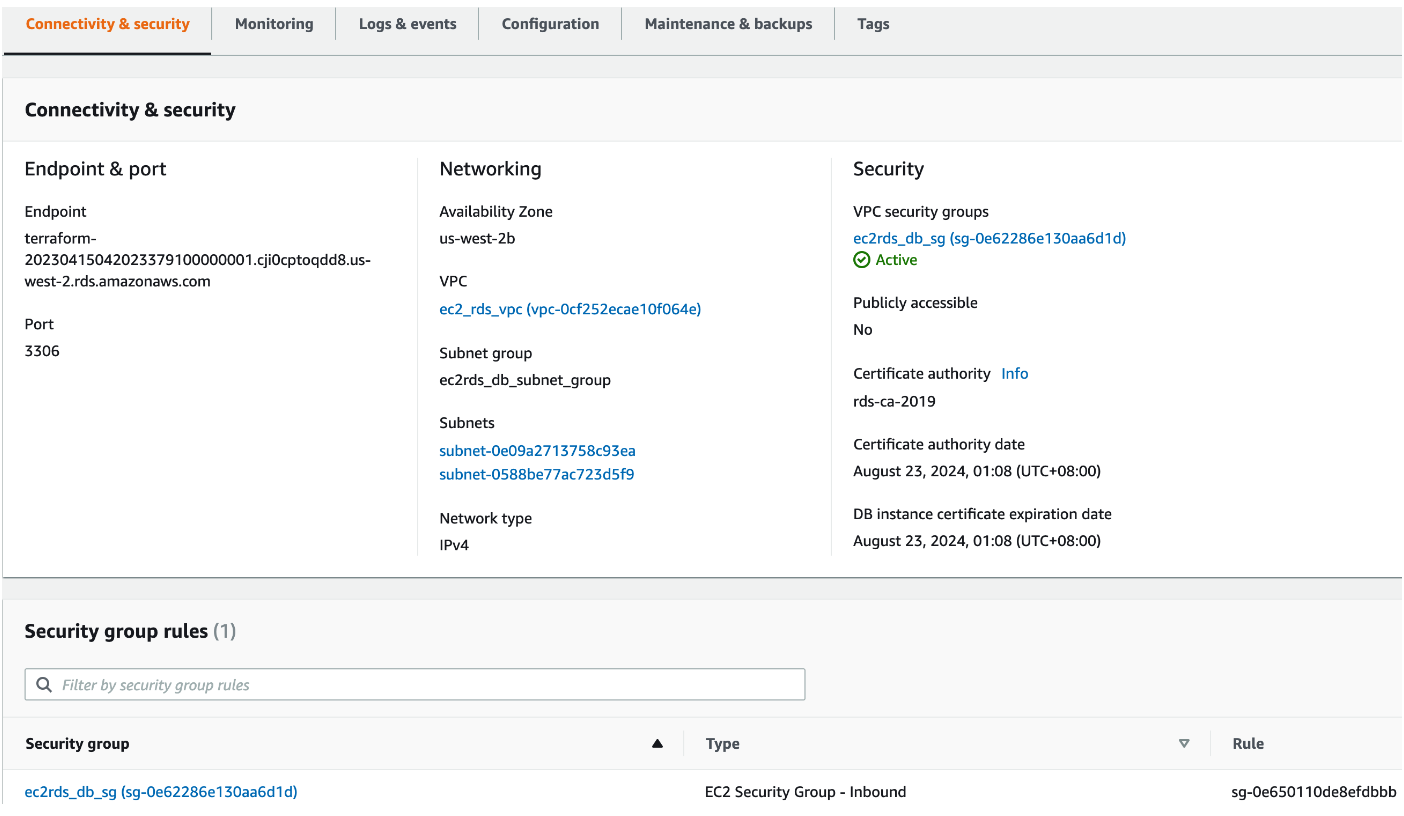
And here's the DB:
EC2
Just to demo, we use terraform to generate key pair:
variable "key_name" {
    default = "ec2rds_key"
}

resource "tls_private_key" "example" {
  algorithm = "RSA"
  rsa_bits  = 4096
}

resource "aws_key_pair" "generated_key" {
  key_name   = var.key_name
  public_key = tls_private_key.example.public_key_openssh
}
And trigger it:
terraform output -raw private_key > key.pem
chmod 400 key.pem
Then we will create EC2 instance and Elastic IP:
resource "aws_instance" "ec2rds_web" {
  count                  = var.settings.web_app.count
  ami                    = "ami-0735c191cf914754d"
  instance_type          = var.settings.web_app.instance_type
  subnet_id              = aws_subnet.ec2rds_public_subnet[count.index].id
  key_name               = aws_key_pair.generated_key.key_name
  vpc_security_group_ids = [aws_security_group.ec2rds_web_sg.id]

  tags = {
    Name = "ec2rds_web_${count.index}"
  }
}

resource "aws_eip" "ec2rds_web_eip" {
  count = var.settings.web_app.count
  instance = aws_instance.ec2rds_web[count.index].id
  vpc = true

  tags = {
    Name = "ec2rds_web_eip_${count.index}"
  }
}

output "web_public_ip" {
  description = "The public IP address of the web server"
  value       = aws_eip.ec2rds_web_eip[0].public_ip
  depends_on  = [aws_eip.ec2rds_web_eip]
}

output "web_public_dns" {
  description = "The public DNS address of the web server"
  value       = aws_eip.ec2rds_web_eip[0].public_dns
  depends_on  = [aws_eip.ec2rds_web_eip]
}

output "database_endpoint" {
  description = "The endpoint of the database"
  value       = aws_db_instance.ec2rds_db.address
}

output "database_port" {
  description = "The port of the database"
  value       = aws_db_instance.ec2rds_db.port
}
We will get the information by the output:
Outputs:

database_endpoint = "terraform-20230415125733155100000002.cji0cptoqdd8.us-west-2.rds.amazonaws.com"
database_port = 3306
private_key = <sensitive>
web_public_dns = "ec2-44-228-83-13.us-west-2.compute.amazonaws.com"
web_public_ip = "44.228.83.13"
Login the bastion server by:
ssh -i "key.pem" [email protected]
Access RDS from bastion server:
sudo apt-get update -y && sudo apt install mysql-client -y

mysql -h terraform-20230415125733155100000002.cji0cptoqdd8.us-west-2.rds.amazonaws.com -P 3306 -u mmuser -p
OK, now we will show the DB:
mysql> show DATABASES;
+--------------------+
| Database           |
+--------------------+
| information_schema |
| mmdb               |
| mysql              |
| performance_schema |
| sys                |
+--------------------+
5 rows in set (0.00 sec)
WOW~ mmdb in it!
By incorporating bastion hosts into your cloud infrastructure and leveraging the power of Terraform for automation, you can establish a secure and controlled access mechanism to safeguard your sensitive resources in the cloud. With the increasing adoption of cloud computing and the rising importance of security, bastion hosts are an essential component of any robust cloud security strategy. So, embrace the power of bastion hosts and fortify your cloud environment today.